
Build Your Own Sauna: The Oceanic Way
From timber selection to finishing touches, learn how Oceanic’s materials help you build a beautiful, relaxing sauna at home.
If our pre-built saunas don't quite match your vision, why not craft your own? With Oceanic's premium timbers and materials, you have everything you need to bring your dream sauna to life. To guide you through the process, we've created a helpful step-by-step guide to ensure your project is a success.
Before you start installing your sauna cabin, let's take a moment to consider a few important factors to ensure a smooth and successful setup.
- -Type of structure, free standing cabin or cladding onto existing wall
- -Domestic or commercial installation
- -Construction of the room the sauna is being installed into (single brick external wall, internal wall etc)
- -Ventilation / Condensation
- -Size of the room including ceiling height
- -Location of the door (must open outwards)
- -Sauna Heater location
- -Bench location
- -Air vent positions
Free Standing Structure
|
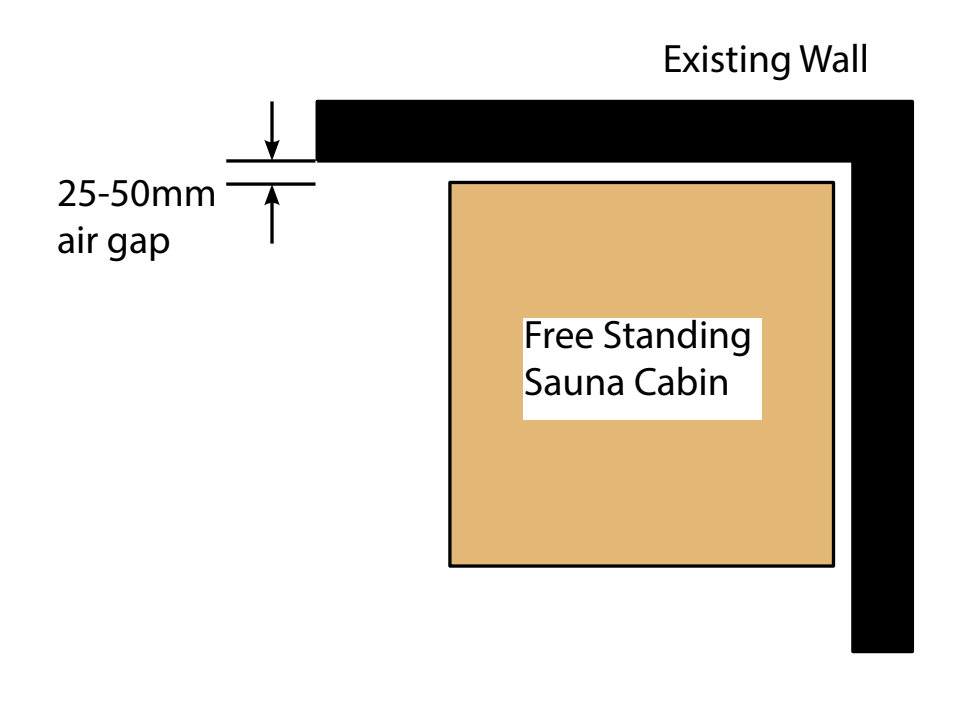
The best method for constructing a sauna cabin inside a property is to build it as a free-standing structure with an air gap surrounding this and any adjacent walls within the room. Air vents must be built into the wall panels at the correct locations depending upon the location of the heater. It may be necessary to install a small extractor fan or simply leave the door open to deal with condensation depending on the building.
|
 |
Sauna Panel Construction
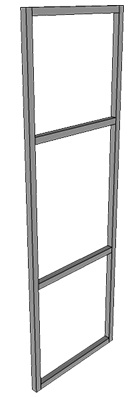
Panel frame constructed using 32 x 32mm framing timber. The space between the framing is to be filled with 50mm Rockwool insulation, which can be sourced from any local builders’ merchants. A special heat proof foil lined vapor barrier and tape should be used between the cladding and framing in commercial applications.
|
Internal Frame - construct from 32x32mm Spruce framing, insulate voids using 50mm rockwool insulation |
 |
|
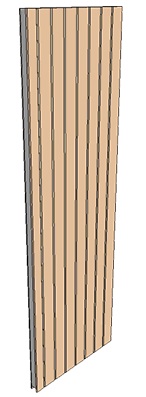
Faces of panel, clad with your chosen cladding material. Panel shown with cladding on both sides. If only inside is visible hardboard can be used on the exterior to reduce costs. |
 |
Panel Dimension
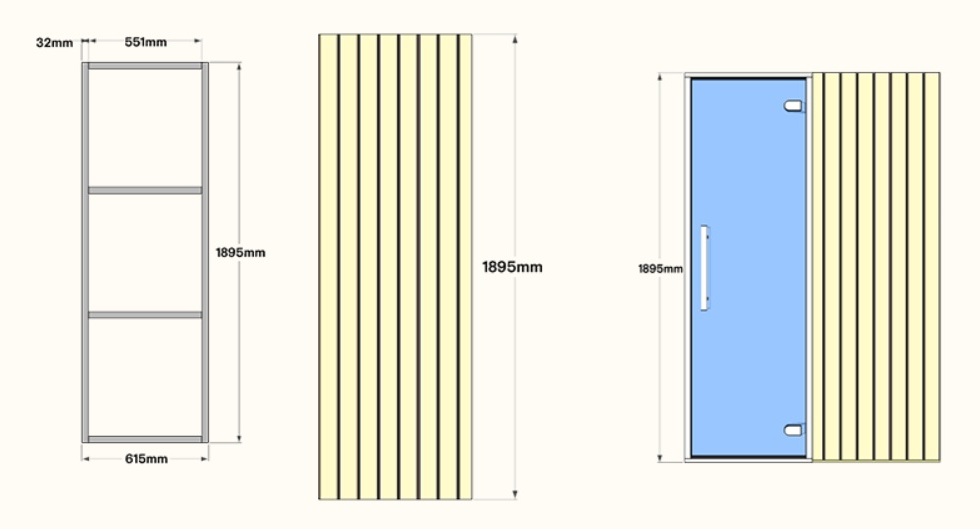
Just follow these dimensions, and our standard doors, glass panels and overlap moulds will slot seamlessly into your sauna cabin.
Panel Frame: 32x32mm Framing
- Uprights: 1895mm
- Bearers: 551mm (Optional width) This creates a 615 mm wide panel, making efficient use of our standard 95mm cladding while ensuring strong structural integrity.
Cladding:
- 1895mm
Base:
- 50x50mm (length will depend on your cabin size) sandwiched between two 19x69mm bench in either Spruce or Abachi either side which your panels will slot into.
Cladding Directly Onto Existing Wall
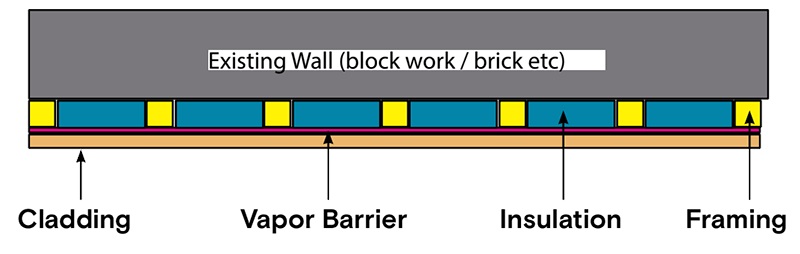
It is possible to clad directly onto existing walls using timber stud framework and simply affix insulation and internal cladding, this may necessitate the inclusion of a vent in the construction. The existing room could, depending upon it’s construction cause condensation to form which is both undesirable to the cabin and the to property.
If cladding directly onto an existing wall it is worth considering the use of a vapor barrier with a foil lining between the cladding and the existing wall. For commercial saunas a vapor barrier is also required when building a free standing sauna as described previously.
It is necessary to check if the room is square. If not square it is advisable to pack the battens to create square walls. When cladding directly to the wall the same frames can be fixed to the wall or just use horizontal battens (vertical battens if horizontal cladding is preferred) similar to a stud wall construction.
Ceiling
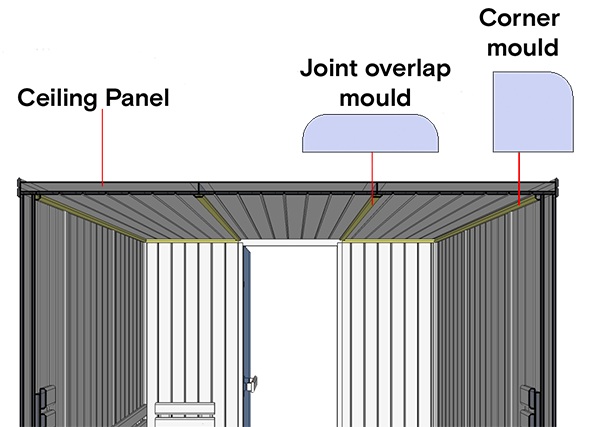
The ceiling will need to be made using frames as shown on the previous page. It may be necessary to clad the frames before installing, joint overlap mould can be used to cover the join between panels. Corner mould can be fitted where the walls meet the ceiling. A nail gun is the best method for fixing overlap and corner mould.
Sauna Cladding
Cladding for walls and ceiling
We stock matchboard cladding in the following dimensions:
- Spruce cladding 9mm thickness 95mm wide with a cover of 85mm
- Spruce cladding 18mm thickness for heavy duty sauna 85mm wide with a cover of 85mm
- Knot free premium hemlock cladding 9mm thickness 85mm wide with a cover of 85mm 95mm wide with a cover of 85mm
- ThermoWood 21mm thickness, 117mm wide with a 95mm cover
All our timber is kiln dried Grade A sustainably sourced from Finland and Canada
For more details, read our cladding technical spreasheet.
See our full range of sauna cladding.
Calculating the number of lengths of cladding required
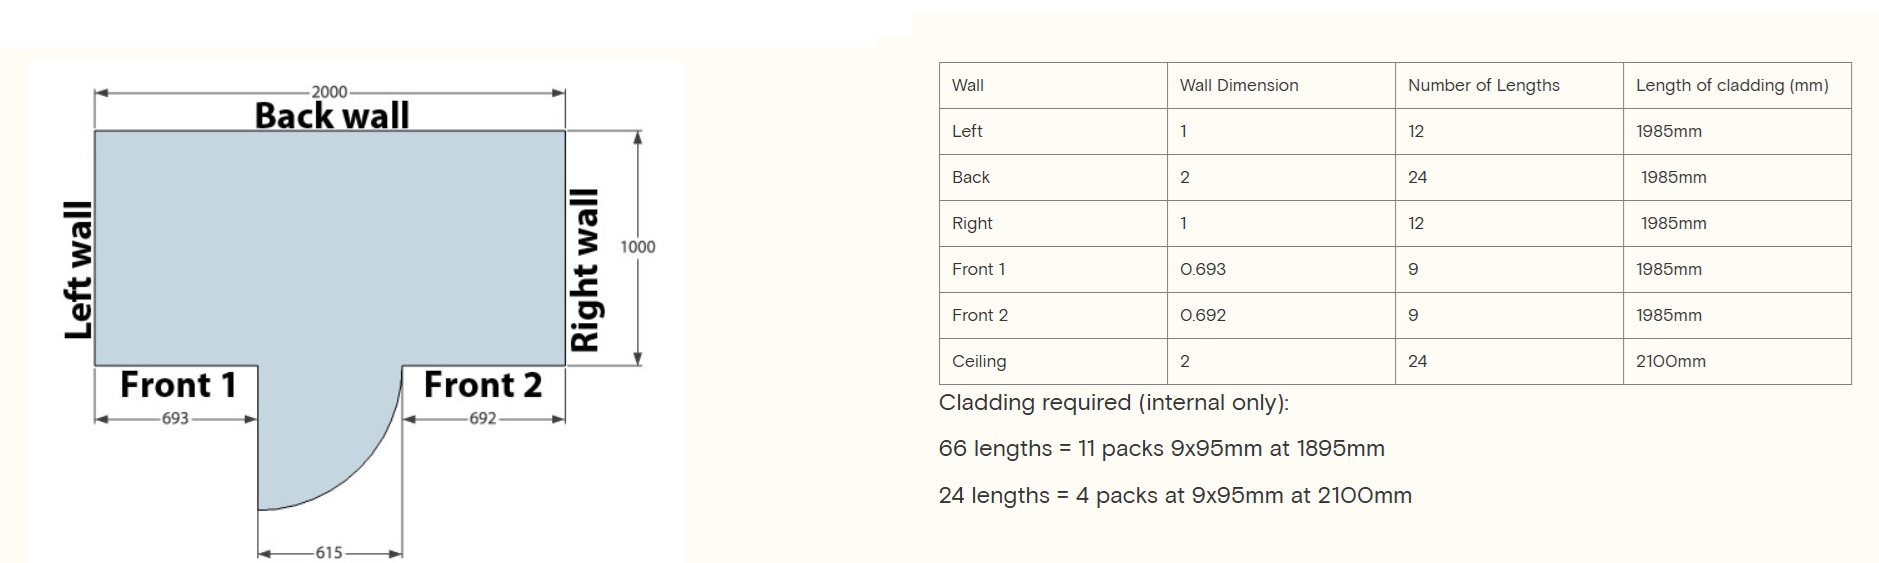
Work out the number of lengths for each wall and ceiling individually
Number of lengths of cladding = Wall length in meters x 12
Length of cladding for walls = Internal ceiling height
Ideal ceiling height
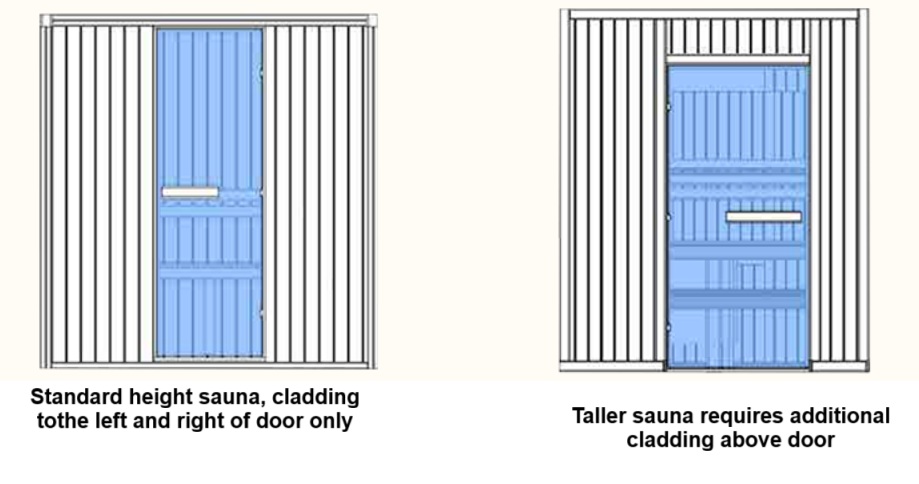
If using an Oceanic Sauna Door the external height of the door frame is 1895mm. If building a free standing structure with frames and a base a typical height for the cladding is 1895mm as shown previously.
A lower ceiling height makes a more efficient sauna as heat rises. If you prefer a taller sauna you will need to consider the area above the door also needs cladding.
For the ceiling cladding work out which direction you want the cladding to be fitted, normally along the longer distance for fewer fixings.
Bench Kits
Oceanic Saunas can provide ready to assemble bench kits including back rests and floor mats, with everything you need to construct your sauna bench kits. The kits are available in a range of stock sizes and can be cut to size onsite as required.
The bench itself is made up of a set of timber slats that are fixed onto a frame with right angled stainless steel brackets. Cross members add further strength and rigidity. This bench is then mounted to the wall via rails and is supported via either one or two high or low supports that fix under the bench. The rails are also supported via rail supports.
See our full range of DIY sauna benches
Ventilation
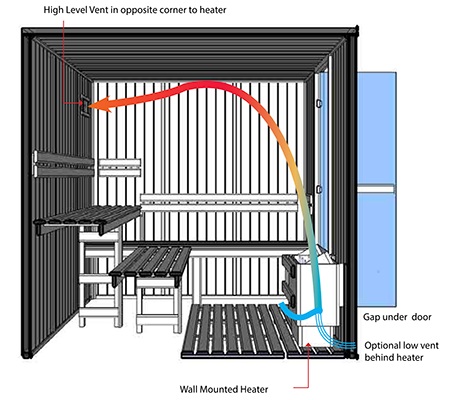
Correct positioning of vents is required for good airflow around the sauna. Fresh cool air can be pulled in via the gap underneath the door with a vent at high level in the opposite side of the room to the heater allowing warm air to escape. An additional vent at low level behind the heater are optional.
Note all vents are passive.
Sauna Wood – Oceanic Saunas’ Commitment to Sustainability and Quality
At Oceanic, we provide only the highest quality wood for building your sauna cabin. The selection of wood is essential to ensure the best performance of your sauna cabin. Here are the different types we offer:
SCANDINAVIAN SPRUCE – KILN-DRIED
Spruce, with its low heat absorption and low resin content, is an ideal choice. Although it grows in many regions, the finest spruce comes from the northern areas of Scandinavia. Generations of skilled loggers combined with the cold climate guarantee straight, strong, and high-quality timber. We work exclusively with Grade A wood – this means no dead knots or cracks. The timber is kiln-dried in its country of origin and carefully inspected again by our quality technicians before being cut.
ABACHI
Abachi is a tropical hardwood grown in Africa. Classified as a white wood, its colour ranges from creamy white to light yellow and darkens slightly over time.Abachi is particularly suited for sauna cabins because of its very low thermal conductivity – it stays “cool” to the touch even in extreme sauna temperatures. It also remains straight and does not warp under weight. With its knot-free appearance and fine interlocked grain, Abachi offers a clean, elegant look and a smooth, soft finish.
CANADIAN HEMLOCK – WALL CLADDING
Western Canadian Hemlock is an excellent choice for saunas for several key reasons: it does not warp, even under extreme conditions; it is knot-free and resin-free; it is hard and durable; and it has an attractive straight grain. The colour of Hemlock ranges from warm red tones to brown. These subtle variations in cladding shades combine to create an overall warm and inviting look.
THERMOWOOD CLADDING
Produced through a specialist heat-treatment process, Thermowood offers enhanced stability, resistance to warping, and a naturally deep colour that adds warmth and style to your sauna. Sustainably sourced and carefully finished, Thermowood D is a premium choice for both outdoor and indoor, home and commercial saunas.
Cutting Sauna Wood
We recommend always ordering wood in longer lengths so you can cut and adapt it to fit your cabin.
Oceanic Saunas cannot be held responsible if the wood ordered does not match your final project – we are here to guide you, but you are responsible for making the adjustments and choosing the sizes and quantities. For this reason, we suggest ordering slightly longer than needed to avoid last-minute disappointments.
Please note: sauna wood cannot be exchanged or refunded. Orders cannot be cancelled once the timber has entered the cutting process.
The wood is shipped on pallets, so please request a quotation before placing your order. Contact us today!